Lesson 1
-
The goal of these threads is to teach students English and Raspberry Pi, ESP32 Programming by posting short tasks and solutions.
To run and compile programs you should use IDE.
Install Python
https://www.python.org/downloads/
Download the next archives
raspberryemulator.zip
esp32simulator-1.0.0Setup.zip
Unpack these archives.
Open esp32simulator-1.0.0Setup.exe and install the program.
Your Windows OS may warn you that this file is dangerous, ignore warning and click More … => Install anyway option!
Create a folder to save ESP32 projects (it can be Local disk C:\esp32projects).
Download and install the program Lightshot to make screenshots
https://app.prntscr.com/ -
Create the file
blinky.pyinside the folder "raspberryemulator" and copy-paste the next code.from EmulatorGUI import GPIO #import RPi.GPIO as GPIO import time import traceback GPIO.setmode(GPIO.BCM) #configures Raspberry Pi to use BCM (Broadcom) pin names led_pin = 4 #creates a new variable led_pin:=4 GPIO.setup(led_pin, GPIO.OUT) #makes GPIO4 an output try: while(True): GPIO.output(led_pin,True) #LED on time.sleep(2) #delay 2 seconds GPIO.output(led_pin, False) #LED off time.sleep(2) finally: print("Cleaning up") GPIO.cleanup() #this ensures a clean exitSave this file as
blinky.py.
In File Explorer, click the address bar to select it (or press Alt+D). Type "cmd.exe" into the address bar and hit Enter to open the Command Prompt with the path of the current folder already set.

Run the next command in cmdpython blinky.pyYou should see GPIO4 blinking.

GPIO.setmode(GPIO.BCM) tells RPi.GPIO that we want to use the names of the pins rather than their position.
The “cleanup” function sets all the GPIO pins back to a harmless input state, reducing the chance of damaging the Pi if one of the pins set to be an output should accidentally short to a power pin or other output -
Open esp32simulator.
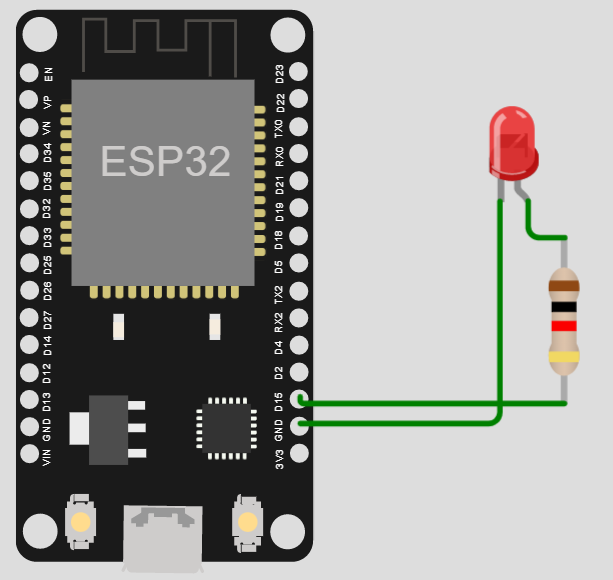
Create the folder "blinky" in the directory "esp32projects". Create "main.py", "diagram.json" inside the folder "blinky".Connect all components with wires in the same way, as in the picture. You can rotate a component by pressing Ctrl+R. The resistor must be connect to D15. Pay attention to LED, since it emits light only if it's connected correctly. The current must go from an anode to a cathode (LED will not emit light if you connect it in the opposite direction).
Paste the next code to
main.py.from machine import Pin from utime import sleep led = Pin(15, Pin.OUT) #makes Pin 15 an output while True: led.on() #turns on LED sleep(2) #time delay 2 seconds led.off() #turns off LED sleep(2)Click the green button to run the project.
You should see a blinking LED.
Save your project to the local folder "blinky". Copy-paste the code from the files "main.py", "diagram.json" in the simulator to your local files. Make a screenshot of the circuit and save the screenshot to the folder "blinky".
Whenever you want to continue programming you can copy-paste the code from the local files to your simulator (Note. The circuit is stored in the file "diagram.json", you don't need to make a new circuit all the time).
Hello! It looks like you're interested in this conversation, but you don't have an account yet.
Getting fed up of having to scroll through the same posts each visit? When you register for an account, you'll always come back to exactly where you were before, and choose to be notified of new replies (either via email, or push notification). You'll also be able to save bookmarks and upvote posts to show your appreciation to other community members.
With your input, this post could be even better 💗
Register Login1 - 2025-01-20
2 - 2025-01-19
3 - 2025-01-18
In 2024, the number of babies born in South Korea increased for the first time in nine years. The change is welcome news for a country that is dealing with serious population problems.